Phones are now the most numerous and widely used cameras in the world. My phone is always with me and close at hand, which makes it great for capturing moments when I don’t have a camera with me or haven’t got time to get one of my many cameras out of their various bags! There’s something informal and carefree about smartphone photography. The pressure is off, I’m just having fun, it’s easy to share my images, and we’re all on a pretty level playing field — unlike with proper cameras where yours may be able to do things mine can’t. That said, over the last six months I’ve really been paying attention to improving my mobile photography. I’ve found that just a little extra effort can make my smartphone pictures a whole lot better. This is what I’ve learned: five tips I hope you’ll find helpful.
1. Shoot straight!
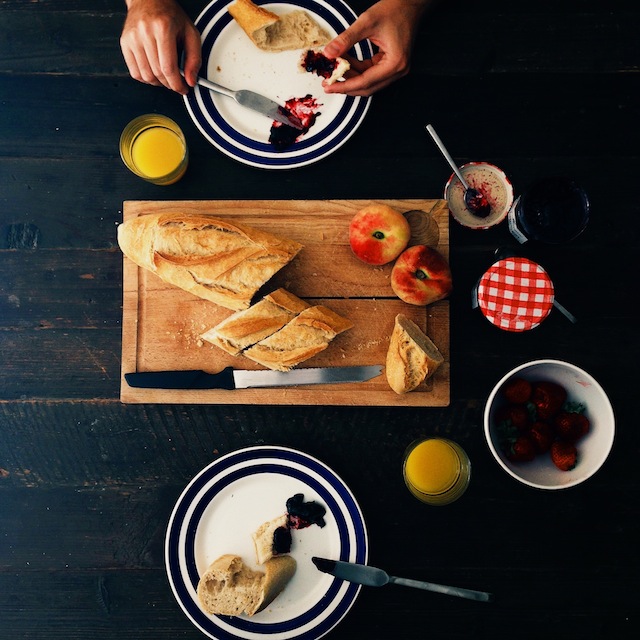
It sounds obvious, but shooting straight can make a big difference. There is nothing as distracting as a wonky picture, particularly when you’re looking at pictures arranged in grids or streams on rectangular slabs of glass. If you shoot the image straight in the first place, you won’t have to straighten it later. And the discipline of checking the horizon lines will also make you more aware of composition and symmetry. So turn the grid on in your camera app (I shoot using the 6×6 app on my iPhone because I like squares). When shooting overhead food shots, like the one below, make sure the camera is straight and parallel to the table, rather than at an angle. Of course, you can always fix things afterwards if necessary in the Instagram app, or in Snapseed or VSCO CAM, but try challenging yourself to take pictures that do not need straightening! And remember that sometimes the world isn’t straight — something I am all too aware of, living in London, where many old buildings are a bit wonky.
2. Don’t use flash or zoom!
I have never used my iPhone camera flash, and I’ve never seen a smartphone image that was improved by flash. So turn it off! Modern smartphones are surprisingly good at taking pictures in low light, though the results can be grainy. That doesn’t matter so much if you’re posting to Instagram, because the image will be scaled down. And why not make a virtue of the grain and moody lighting? With smartphone pictures taken in low light (like this picture of Miles) I often find that they look better processed as black-and-white images. As for zoom, some new smartphones have proper zoom lenses built into them, but for most phones the digital zoom is best avoided. Instead, zoom after the event by cropping the picture when you post it. Once again, Instagram’s relatively low resolution is your friend: your camera is producing far more pixels than Instagram needs, so you can crop images quite tightly and they’ll still be sharp.

3. Figure out focus and exposure!
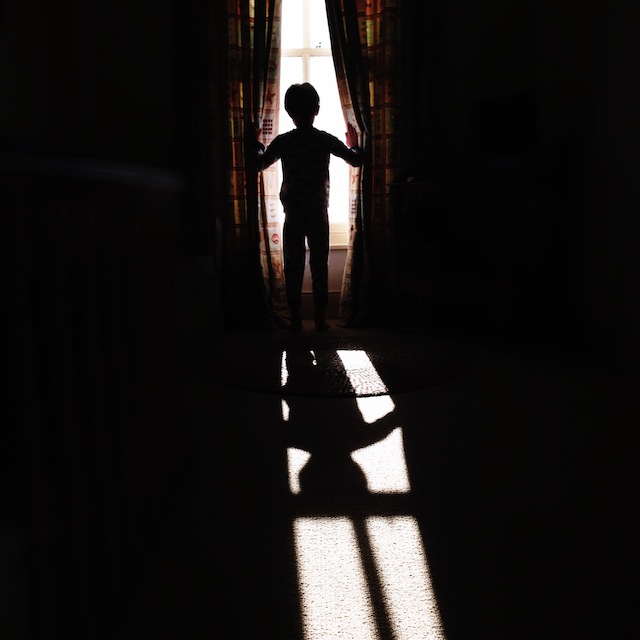
One of the nice things about using a smartphone is that there are no dials, buttons or other controls to worry about. But taking five minutes to find out exactly how to set the points in the image that determine the focus and exposure, which can usually be set separately, on your phone is time very well spent because it gives you so much more control, and can dramatically improve your images. On iPhones, you tap once for focus and hold down for exposure. I usually try and expose for the midtones, but sometimes exposing on the lightest part of the image can make a picture more dramatic. (To emphasise the morning light and shadows in this picture, for example, I focused on Miles and set the exposure on the opening of the curtains to make it more dramatic.) I also bracket my pictures when I am shooting outside, often taking several at different exposures. It can be quite hard to judge the correct exposure when taking pictures with a phone, especially in bright sunlight, so I make sure to process them indoors where I can see them better.
4. Don’t use the filters in social media apps!
The filters built into Instagram (and now in the Twitter and EyeEm apps too) let you get results quickly, but they’re not exactly subtle, and there’s now a huge range of other apps available that can process your images with more finesse. In particular, apps like VSCO CAM and PicTapGo let you decide how strongly to apply filters and effects, rather than just letting you switch them on or off. Experiment with a few apps and figure out which one works best for you. It’s a few extra steps, but it makes a big difference and gives you the scope to define your own style if you want to, rather than being limited to off-the-shelf options.
5. Follow people whose work inspires you.
This is the most important tip of all! I use Instagram as my mobile-phone social network, but for further inspiration I often go to EyeEm and the VSCO grid. It’s a good way to see what other people are doing, and it’s also a fantastic way to keep up with the fast-moving world of mobile photography as novel features (like, say, video and Flipagrams) become more popular and new processing apps emerge. It’s great to see what your friends are doing, but it’s also good to spice things up by following a few new people every week who can inspire you to try new things. Dive in!
I have a particular aim in all of this, which is that at the end of the summer I’m going to make a printed Artifact Uprising book of just my mobile images, which will give me a different perspective from my film and DSLR pictures. But I suspect that being more disciplined about the pictures I take with my phone — which is the camera I use most often — has improved my photography overall. Just as painters practise by sketching and doodling, we can improve our photography and train our eyes, even when we don’t have a proper camera with us, by trying just a little bit harder with our phones.
Great Tips – Going to tweet this out right now!
Thank you!
Thanks so much! Love everything you’ve shared here – and well, we’re excited to be the lucky ones who get to print those beautiful photos!!
You are kind! I can’t wait to see the final book once the summer is finished.
Love all these tips Kirsten! Awesome shots too 🙂
Thank you Holly!
Great tips, Kirstin!
Thank you, Meghan. x
Great tips Kristen. Having recently begun printing out my images I can only agree that the Instagram filters generally are not terribly subtle when printed.
Oh that is good to know! Thanks for the tip!
Good stuff Kirstin! Simple and effective. Love your photos – follow them eagerly on Instagram.
Thank you! You are kind.
You have the very best advice sweetie pie!!!! xxxooo
Linda. I can’t wait to do some table top shots with you! x
Thanks for the tips, I have only just joined the phone photography sisterhood and am eager to make the most of my new piece of equipment. Your final paragraph makes perfect sense and somehow justifies what some photographers might see as just a waste of time if you are serious about your craft.
Thank you! It’s going to be interesting to see where smartphone photography goes in the future.
Thank you so much for posting this! Being fairly new to smartphone photography, this is extremely helpful!
I am pleased to hear it, Susan! Thank you.
Some great tips here! Figuring out focus and exposure is particularly important – it’s so simple, but can make such a big difference.
I do want to speak up in defense of IG’s filters; they may not be subtle but sometimes they’re just what my image needs, Earlybird and the monochrome ones in particular 🙂
I shall have to give them another try in that case, Jenny!
Terrific post, Kirstin and the images are just gorgeous!
Thank you Nikki. x
I totally agree with Art&Lemons: terrific post! So many interesting thoughts! I especially like the comparison of the sketchbook and the iPhone, there is so much truth to this. I learnt a lot about the pros and cons of the iPhone this summer, when my DSLR got broken during my vacation… once I had overcome the disappointment I thought of this a chance…
I took it as a chance to develop my eye too. Have you bought the D600 yet? My new D800 arrived last week and I love it.
Taking your advice into serious consideration I finally couldn’t resist – I bought a D800…
Yes! Good for you! x
Great post! I LOVE VSCOcam, and VSCOgrid is to die for.
Very true point about learning how to take better photos with your phone can make you a better photographer overall – I definitely agree! It’s when we’re able to create something awesome within the contraints of iphoneography (or just mobile-phoneography in general) that we’re able to really appreciate and make the most of the “better” equipment.
Thank you Kristina. Those constraints are there to be pushed to the boundaries, for sure!
I’m looking forward to seeing your book, I told you I think your tablescapes ALONE would rock my coffee table 😀
PS miss my muses but thankfull you all have phones and use them regularly on IG!!
Sweet Lindsey. Thank you. x
Love the post…I am quite guilty of using Instagram filters out of laziness I’m afraid.
what great tips and that last line is so true, taking photos with my phone is my sketching!